Spring Boot 使用了一个全局的配置文件 application.properties,放在 src/main/resources 目录下或者类路径的 /config 下。Sping Boot的全局配置文件的作用是对一些默认配置的配置值进行修改。
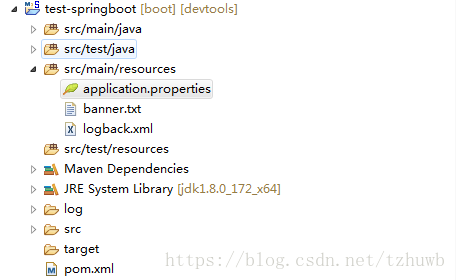
一、添加 application.properties 文件。
添加后目录结构如下图:

注意:开发过程中,尽量把配置文件的编码设置为 UTF-8,这样中文不会出现乱码,便于添加注释。
二、常用常量配置
application.properties 提供自定义属性的支持,这样可以把一些应用中用到的常量配置在该文件中,内容如下:
#################################
## 常量值配置
#################################
com.mll.constant.val.name=zhangsan
com.mll.constant.val.age=20
# 参数间直接引用
com.mll.constant.val.str=${com.mll.constant.val.name}'s age is ${com.mll.constant.val.age}.
新建一个常量值测试类 ConstantController.java,代码如下:
- package com.menglanglang.test.springboot.controller;
- import org.springframework.beans.factory.annotation.Value;
- import org.springframework.web.bind.annotation.RequestMapping;
- import org.springframework.web.bind.annotation.RestController;
- /**
- * @desc Controller常量类
- *
- * @author 孟郎郎
- * @blog http://blog.csdn.net/tzhuwb
- * @version 1.0
- * @date 2018年7月24日下午7:15:42
- */
- @RestController
- @RequestMapping("/cfg")
- public class ConstantController {
- // 常量值配置name
- @Value(value = "${com.mll.constant.val.name}")
- public String name;
- // 常量值配置age
- @Value("${com.mll.constant.val.age}")
- private String age;
- // 常量值互相应用
- @Value("${com.mll.constant.val.str}")
- private String str;
- @RequestMapping("/outStr1")
- public String printOutStr1() {
- String outStr1 = "name = " + name + ", age = " + age;
- return outStr1;
- }
- @RequestMapping("/outStr2")
- public String printOutStr2() {
- return str;
- }
- }
启动程序,浏览器访问 http://localhost:8080/cfg/outStr1,则返回如下结果:

访问 http://localhost:8080/cfg/outStr2,则返回如下:

如果属性过多,也可以使用实体封装这些属性值。但需要在 pom.xml 文件中新加一个依赖包,代码如下:
		<!-- 添加 Spring Boot 配置文件依赖包 -->
		<dependency>
			<groupId>org.springframework.boot</groupId>
			<artifactId>spring-boot-configuration-processor</artifactId>
			<version>2.0.2.RELEASE</version>
			<optional>true</optional>
		</dependency>
新建源码包 entity,在其中新建实体类 PeopleInfo,内容如下:
- package com.menglanglang.test.springboot.entity;
- import org.springframework.boot.context.properties.ConfigurationProperties;
- import org.springframework.stereotype.Component;
- /**
- * @desc 人实体信息
- *
- * @author 孟郎郎
- * @blog http://blog.csdn.net/tzhuwb
- * @version 1.0
- * @date 2018年7月24日下午8:05:11
- */
- @ConfigurationProperties(prefix = "com.mll.constant.val")
- @Component
- public class PeopleInfo {
- /**
- * 姓名
- */
- private String name;
- /**
- * 年龄
- */
- private String age;
- public String getName() {
- return name;
- }
- public void setName(String name) {
- this.name = name;
- }
- public String getAge() {
- return age;
- }
- public void setAge(String age) {
- this.age = age;
- }
- }
在需要使用时,直接注入实体类即可。
	@Autowired
	private PeopleInfo peopleInfo;

	@RequestMapping("/outStr3")
	public String printOutStr3() {
		String outStr3 = "Name = " + peopleInfo.getName() + ", Age = " + peopleInfo.getAge();
		return outStr3;
	}
访问 http://localhost:8080/cfg/outStr3,则返回如下:

注意:如果有以下错误,说明实体在程序启动时,没有注入。
- 2018-07-24 21:25:57,938 INFO (DirectJDKLog.java:180)- Stopping service [Tomcat]
- 2018-07-24 21:25:57,951 INFO (ConditionEvaluationReportLoggingListener.java:101)-
- Error starting ApplicationContext. To display the conditions report re-run your application with 'debug' enabled.
- 2018-07-24 21:25:58,108 ERROR (LoggingFailureAnalysisReporter.java:42)-
- ***************************
- APPLICATION FAILED TO START
- ***************************
- Description:
- Field peopleInfo in com.menglanglang.test.springboot.controller.ConstantController required a bean of type 'com.menglanglang.test.springboot.entity.PeopleInfo' that could not be found.
- Action:
- Consider defining a bean of type 'com.menglanglang.test.springboot.entity.PeopleInfo' in your configuration.
方法一:在项目入口类 App.java 中添加注解 @EnableConfigurationProperties({PeopleInfo.class}),如图:

方法二:在实体类上,添加注解 @Component,如图:

一般使用方法二注入实体,便于维护。方法一在实体信息很多的情况下,则多而乱,不便于维护。
三、使用自定义的配置文件。
Spring Boot 默认读取的配置文件名为 application.properties,所以新建后不用做任何其他文件名配置就可以获取文件中的配置内容,而很多情况下,如果需要自己定义一个配置文件,比如 test.properties,那么如何读取该文件中的配置。
比如 test.properties 的内容如下:
#################################
## 测试配置文件
#################################
# 测试字符串,自定义属性,可以在Controller中读取
com.mll.constant.val.test1=Hello Test String
在 entity 包中自定义测试实体类 TestInfo,代码如下:
- package com.menglanglang.test.springboot.entity;
- import org.springframework.boot.context.properties.ConfigurationProperties;
- import org.springframework.context.annotation.Configuration;
- import org.springframework.context.annotation.PropertySource;
- /**
- * @desc 测试实体类
- *
- * @author 孟郎郎
- * @blog http://blog.csdn.net/tzhuwb
- * @version 1.0
- * @date 2018年7月24日下午8:45:47
- */
- @Configuration
- @PropertySource("classpath:test.properties")
- @ConfigurationProperties(prefix = "com.mll.constant.val")
- public class TestInfo {
- /**
- * 测试1
- */
- private String test1;
- public String getTest1() {
- return test1;
- }
- public void setTest1(String test1) {
- this.test1 = test1;
- }
- }
在需要使用时,直接注入实体类即可。
	@Autowired
	private TestInfo testInfo;

	@RequestMapping("/outStr4")
	public String printOutStr4() {
		String outStr4 = "test1 = " + testInfo.getTest1();
		return outStr4;
	}
访问 http://localhost:8080/cfg/outStr4,则返回如下:

注意:使用新版本 springboot,使用上面的配置,如果是 1.5 之前的版本,则实体类中,注解方式如下:
- package com.menglanglang.test.springboot.entity;
- import org.springframework.boot.context.properties.ConfigurationProperties;
- import org.springframework.context.annotation.Configuration;
- import org.springframework.context.annotation.PropertySource;
- import org.springframework.stereotype.Component;
- /**
- * @desc 测试实体类
- *
- * @author 孟郎郎
- * @blog http://blog.csdn.net/tzhuwb
- * @version 1.0
- * @date 2018年7月24日下午8:45:47
- */
- @ConfigurationProperties(locations = "classpath:test.properties", prefix = "com.mll.constant.val")
- @Component
- public class TestInfo {
- /**
- * 测试1
- */
- private String test1;
- public String getTest1() {
- return test1;
- }
- public void setTest1(String test1) {
- this.test1 = test1;
- }
- }
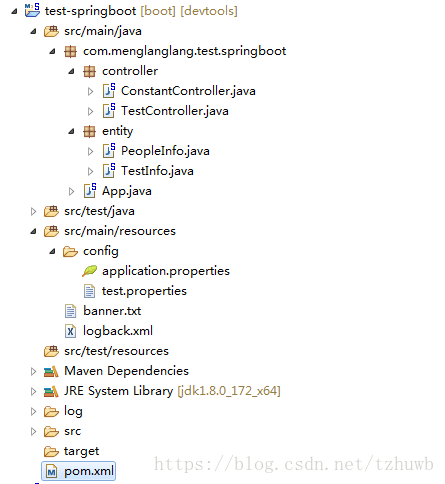
最后附上当前源码,源码中有点小改动,就是把两个配置文件都放在了 /config 目录下,当前目录结构如下:


