大多数 WEB 开发,都还是用的 JSP 页面,所以如何让 SpringBoot 项目支持 JSP,这篇简单说一下。
一、需要引入依赖的 jar 包。
查看 pom.xml 文件中是否引入下面的 jar 包,如果没有引用,则需要引用才行。
		<!-- 该依赖包提供了MVC、AOP等的依赖包 -->
		<dependency>
			<groupId>org.springframework.boot</groupId>
			<artifactId>spring-boot-starter-web</artifactId>
			<version>2.0.2.RELEASE</version>
		</dependency>

		<!-- 添加JSP页面支持 -->
		<dependency>
			<groupId>org.apache.tomcat.embed</groupId>
			<artifactId>tomcat-embed-jasper</artifactId>
			<version>8.5.31</version>
			<scope>compile</scope>
		</dependency>
二、修改配置文件。
# 配置访问页面的前缀
spring.mvc.view.prefix=/WEB-INF/pages/
# 配置访问页面的后缀
spring.mvc.view.suffix=.jsp
指定 JSP 文件存放的路径以及文件后缀名。
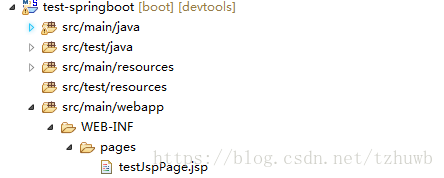
三、添加源码目录。
创建 src/main/webapp 源码目录,其下依次创建 WEB-INF/pages/*.jsp。如图:
四、编写 JSP 页面文件。
testJspPage.jsp 内容为:
- <!DOCTYPE html>
- <html>
- <head>
- <title>TEST JSP PAGE</title>
- <meta http-equiv="content-type" charset="UTF-8">
- <meta name="description" content="JSP测试页面" />
- <style type="text/css">
- table {
- width: 50%;
- border-collapse: collapse;
- }
- table, th, td {
- border: 1px solid black;
- }
- .redfont {
- color: red;
- }
- </style>
- </head>
- <body>
- <table>
- <tr>
- <th>DESC</th>
- <th>VALUE</th>
- </tr>
- <tr>
- <td>String Value From application.properties</td>
- <td class="redfont">${testSpringCfgStr}</td>
- </tr>
- </table>
- </body>
- </html>
五、添加测试类。
新建测试类 JspPageController.java,内容如下:
- package com.menglanglang.test.springboot.controller;
- import java.util.Map;
- import org.springframework.beans.factory.annotation.Value;
- import org.springframework.stereotype.Controller;
- import org.springframework.web.bind.annotation.RequestMapping;
- /**
- * @desc JSP页面控制类
- *
- * @author 孟郎郎
- * @blog http://blog.csdn.net/tzhuwb
- * @version 1.0
- * @date 2018年7月25日下午5:43:03
- */
- @Controller
- @RequestMapping("/jsp")
- public class JspPageController {
- @Value("${com.mll.constant.val.str}")
- public String testSpringCfgStr;
- /**
- * 测试Spring配置文件定义的常量字符串
- *
- * @return
- */
- @RequestMapping("/testJspPage")
- public String testJspPage(Map<String, Object> map) {
- map.put("testSpringCfgStr", testSpringCfgStr);
- return "testJspPage";
- }
- }
六、测试
启动项目,在浏览器中访问 http://localhost:8080/jsp/testJspPage,结果如下:

到此,JSP 支持添加完毕。